Killing Floor 2 Wmap Orkshop Tutorial Upload
Introduction
This page includes a comprehensive guide on getting started with the Killing Flooring 2 SDK for creating Maps and uploading them to the Steam Workshop. Information technology is recommended that whatsoever new Level Designer should begin past looking at Official Maps and seeing how they arroyo particular scenarios.
Installation and Offset Launch
To install the SDK:
- Open up Steam, hover over 'Library' and select the 'Tools' option.
- From hither locate 'Killing Floor 2 - SDK' and install information technology as yous would whatsoever game on Steam
- In one case the download is complete, launch information technology as you would any other game.
| | If an opt-in Beta/preview is happening at the time, both the game and the SDK need to be on the same branch. Otherwise the SDK will crash on launch. i.e. If you are in the opt-in Beta for an update, the SDK too needs to exist on the opt-in Beta. |
Interface Guide
| | The SDK Interface is very laggy on launch - using up a lot of resource on your figurer. To prevent the UI lag, simply create an empty save file or open up upwards an existing map e.one thousand. KF-TempMapName |
Commencement Launch and Glance
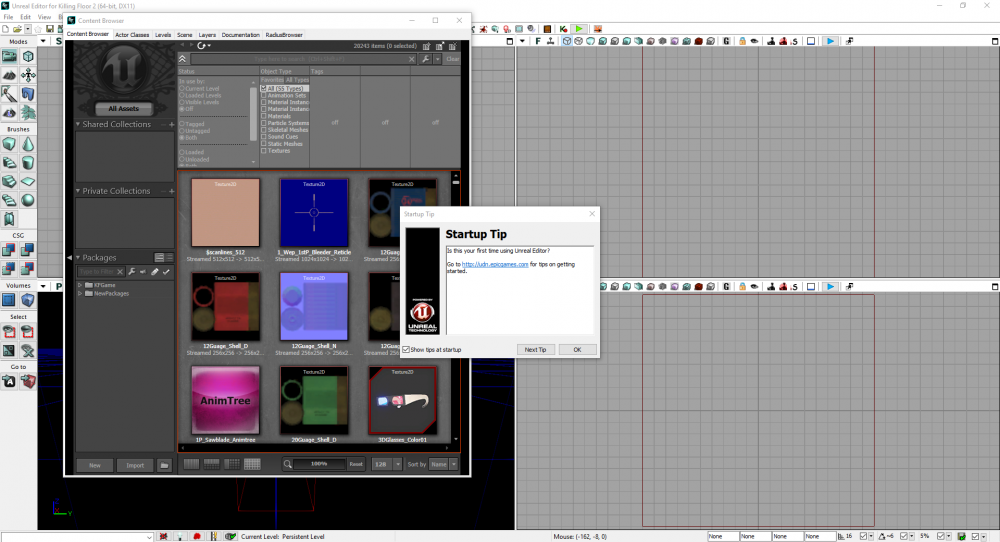
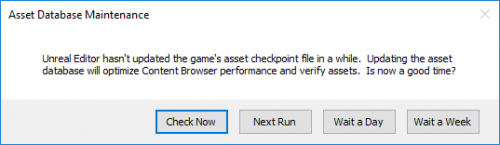
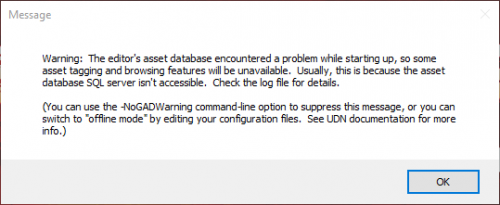
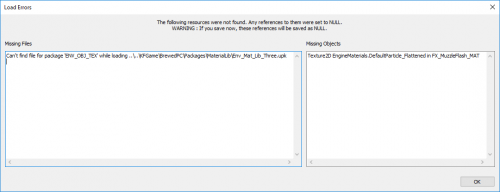
| On starting time launch you may be prompted with a couple of dialogs. They are things that don't bear on the editor or its performance so yous can ignore and click past them. See Figures 3.i. Past all the error dialogs your Editor should look something like Figure 3.2 beneath. Effigy 3.two: Default State of the Editor
| Effigy 3.1a: Checking volition always result in error, so only ignore and wait a week Figure iii.1b: Can safely ignore, you tin put "-NoGADWarning" as the warning suggests into the Steam launch options for the SDK to suppress the alarm Figure three.1c: Mutual mistake in the SDK, can safely ignore |
SDK and Viewport Overview
Below is a breakdown of the cadre elements that yous will be using in the SDK
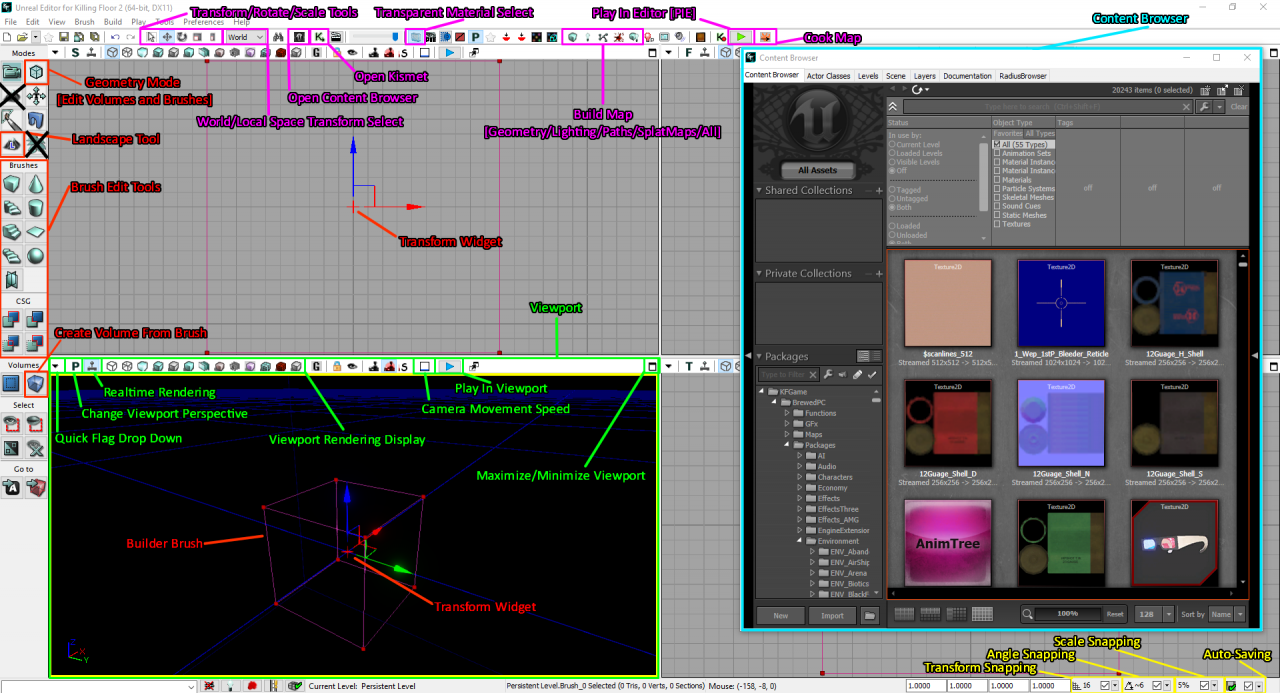
Figure 3.3: Interface Overview
There are 2 crossed out buttons on the side card:
- The Terrain Tool - Obsolete, use the Landscape tool instead.
- Foliage Pigment Tool - Non supported, will crash the Editor when y'all build Lighting.
Content Browser Overview
The Content Browser is large enough to break it down in its own paradigm. The Content Browser is where you lot will be grabbing all Assets (Actors, Meshes, Materials, Sounds, Decals, etc). It also serves as a tool for managing and organising your map'southward ain individual assets, and also organising assets into Layers.
Common Hotkeys
| Hotkey | Part | Hotkey | Role |
|---|---|---|---|
| Left Click | Select role player | Spacebar | Toggle between Motility/Rotation/Scaling |
| Correct Click | Open Context Bill of fare | ~ | Toggle betwixt World and Local space transforms |
| Ctrl + Left Click | Multiple select | N | Toggle Pathnodes |
| Right Click + Scroll Wheel | Alter movement speed effectually viewport | P | Toggle Paths |
| Alt+Drag with Widget | Duplicate and move with widget | T | Toggle Lanscape/Terrain |
| Ctrl+Z | Undo | O | Toggle Volumes |
| Ctrl+Y | Redo | B | Toggle Builder Brush |
| H | Hibernate selected actors | Alt+C | Toggle Collision Wireframes |
| Shift + H | Hibernate all just selected actors | ] | Increase filigree snap size |
| Ctrl + H | Unhide all actors | [ | Descrease grid snap size |
| K | Toggle Game View style in viewport | Ctrl + number | Set a bookmark |
| F4 | Open actor properties | number | Snap to bookmark |
| Ctrl+B | Find selected asset in the Content Browser |
In that location are a lot more hotkeys for the editor, these are the primary ones people usually have issue with when first starting out. Y'all can bank check for others hither: https://sites.google.com/site/lessonsdarrenmckinsey/udk-hotkeys
| | NEVER Grouping avails together. At that place is an option to exercise and then using Ctrl+G, withal this should be completely avoided equally doing then volition crash the game and possibly the editor when yous try and play it. |
Boosted Preferences
These are some additional options y'all may or may not desire to use based on your personal preferences:
- Preferences > Flight Camera Controls
- Default is 'Use WASD for Camera Controls' - Standard FPS controls
- 'Never utilise WASD for Camera Controls' - KF1 Editor Controls
- Preferences > Highlight Objects Nether Mouse Cursor
- Preferences > Editor Language
- View > Change Autosave Options > Autosave Interval
Your Starting time Map
Naming
Your offset map tin exist named anything withal a Killing Floor 2 map MUST be prefixed with 'KF-'. If information technology isn't, it cannot exist played or recognized within the game.
Your map file name should also match your map's proper noun.
If your map name has spaces, it is common naming convention to use UpperCamelCase. Avoid using underscores or dashes to represent spaces.You lot should likewise avoid publishing a map with numbers or 'versions' at the cease, this can be a pain for server owners if they want to host your map on their server.
| Map Name | Good File Name | Bad File Names |
|---|---|---|
| Burning Paris | KF-BurningParis.kfm | KF-Burning_Paris.kfm KF-Burning-Paris.kfm KF-Paris.kfm |
| Zed's Diner | KF-ZedsDiner.kfm | KF-Zeds_Diner.kfm KF-Zeds-Diner.kfm KF-ZesDinner.kfm KF-ZedsDinerTestingV3.kfm |
File Salve Location
You lot tin save and load your map from any location. Yet the best recommended location is:
C:\Users\UserName\Documents\My Games\KillingFloor2\KFGame\Unpublished\BrewedPC
The master reason is, when you programme to upload your map to the workshop, the Workshop Front-Cease will look specifically in only this location for files to upload. Additionally if yous plan to cook your map, information technology needs to be in this location for it to successfully cook.
I would avoid placing your working map file under the steam game directory as well (C:\Programme Files (x86)\Steam\steamapps\common\killingfloor2\KFGame\BrewedPC\Maps). This directory may confuse your editor if you plan to import, motility, rename or edit avails inside your map's own directory.
Earth Settings
World Settings can set important information for your map such as: Map Name, Map Author, Spawning Modifiers, Objectives and Collectibles, What game way is played in the Editor, what in-game music the game uses and Optimization options.
To access information technology become to: View > World Properties.
For the moment, merely go out about of the variables default, but you lot can:
- Input your map proper noun and your user name in the appropriate areas nether the 'Earth Info' section.
- Change the 'Default Game Type' and 'Game Type for PIE' to "KFGameInfo_Survival" under the 'Game Type' department.
Important Tip Before Moving Frontward
The SDK is stable for the most part, but information technology is not uncommon to encounter crashes at any bespeak in its usage. In fact its something you need to be prepared for and goes without proverb that:
| | You lot SHOULD Salve Every bit FREQUENTLY As POSSIBLE |
While the auto-salvage function is useful for beginners, most users that get familiar opt to plow information technology off as it can interrupt workflow, bloat your game directory and besides on large maps, take a long time to save.
Here are some recommended times to save:
- Later on any pocket-sized, moderate to large changes washed in whatsoever attribute to your map
- Every x minutes
- If you programme to step away from the computer for a bit (east.g. going to the toilet)
- Earlier every Build (Lighting, Pathing, etc.)
- Planning to use or work with BSP Brushes
- Before importing new Assets (textures, meshes, sounds, etc.)
- Before placing down whatever newly imported Mesh
- Earlier moving/copying/duplicating assets in your map's directory
- Before combining meshes and/or applying collisions from the Builder Brush
Afterward losing significant progress in one case or twice, saving frequently will become 2nd habit.
Placing Assets and Props
Using the Content Browser
The Content Browser is where you lot will get all the meshes, textures/materials and any other avails needed to brand your map. The general procedure of using the content browser is drag and drop or selecting and asset and correct clicking in the scene to identify or replace avails.
The Content Browser can be located at "View > Browser Windows > Content Browser"
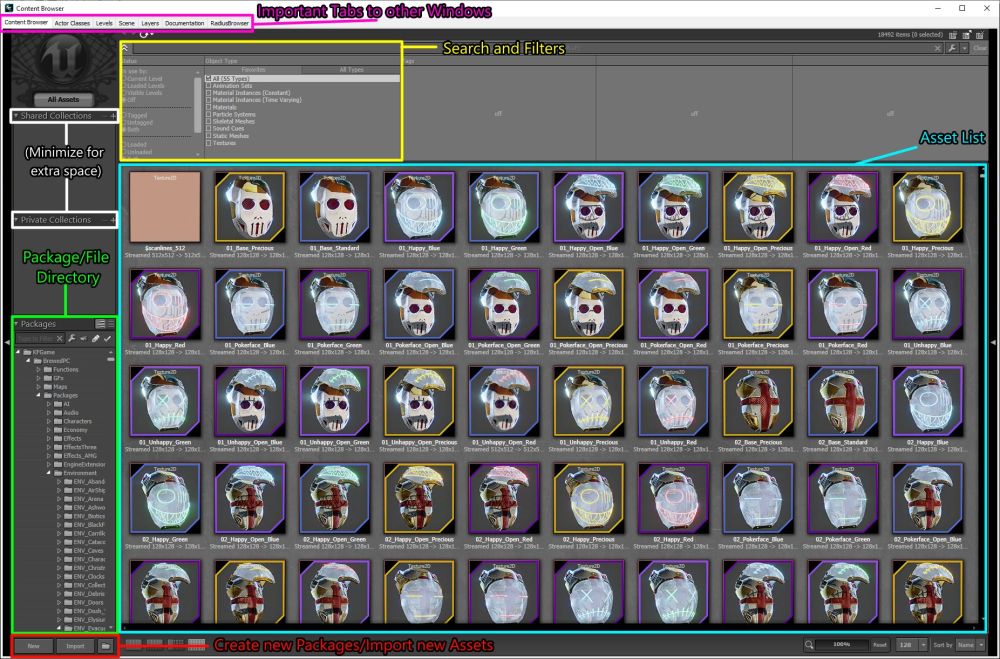
Figure v.1: Default State of the Content Browser
The Important Tabs to other Windows in the image above is important to retrieve, you can quickly navigate between of import windows that will assist in understanding maps.
| Tab | Clarification |
|---|---|
| Content Browser | What yous currently run across |
| Role player Classes | All placeable classes, usually if you need a specific KFActor to identify in your scene you tin look for it hither. |
| Levels | Will show the currently loaded level and its sublevels on official maps |
| Scene | Contains all the actors/assets in the scene. If you are looking for a specific actor and cant notice it await here. |
| Layers | Works just like in Photoshop, allows yous to assign specific avails to layers to organize and hide. A lot of official maps take some layers turned off (such as Skylights in Burning Paris) by default when y'all load the map. Simply plough them on to make the assets visible in the scene. |
Near of the avails you lot see are default user interface and cosmetic items that cannot really be used for mapping. Assets for mapping are located in the Package/File Directory in the "KFGame > BrewedPC > Packages > Surround" subfolders.
| | Assets are not located in the "Maps" subfolder - with exception to Biolapse and Desolation assets which will be unusable for you lot project unless you migrate them into your map package |
To load assets you wish to use in your project right click on the "ENV_" package and right click "Fully Load". This will take a second equally the SDK loads in the assets into memory. If you want to use assets from maps simply locate the corresponding "ENV_" package and load it or alternatively open the map which will also load the assets and any other assets it uses non independent in its own ENV_ parcel. To become started fully load the "ENV_Modular_StaticSet" bundle.
| | It is usually non a skillful idea to fully load the entire "Environs" folder as information technology will often crash the Editor. |
Using the Modular Static Mesh Set up
All maps in KF2 start from and are built from the Modular Static Mesh Set instead of BSP Brushes like in traditional Unreal Engine maps. The meshes are very advisedly modelled and texture unwrapped to work with tiling textures without any seams.
You lot tin can find resource on how to utilise the Modular kit hither:
Comprehensive Wiki Guide: Setting Upwardly Modular Static Set (Killing Floor 2)
Community Tutorial Playlist (past Kuebic): Killing Floor two SDK Tutorials
C:\SteamLibrary\steamapps\common\killingfloor2\KFGame\BrewedPC\Maps\SDK\Mod_Tools_Modular_Template C:\SteamLibrary\steamapps\mutual\killingfloor2\KFGame\BrewedPC\Maps\SDK\Mod_Tools_Demo_Map
| | Tips for working with the Modular Kit
|
| | Communication from an Experienced Mapper When you first showtime using the modular kit, you may feel compelled to have corners perfectly aligned with the corresponding Corner-In and Corner-Out pieces. Only this is a waste matter of time. It is practiced to empathise how these pieces work together, but in practise y'all often do non need to worry about them. When we start to add pillars, set-dressings and other assets to make the map visually interesting you will detect that corners often become hidden. The time spent meticulously getting corners prepare correctly is often wasted or never noticed by players; it is better to spend time elsewhere. If the corner is bare or where players will spend a lot of fourth dimension, then it would be appropriate to employ them correctly. But otherwise do non worry well-nigh information technology too much until yous start to polish the map. |
Changing Materials (Textures)
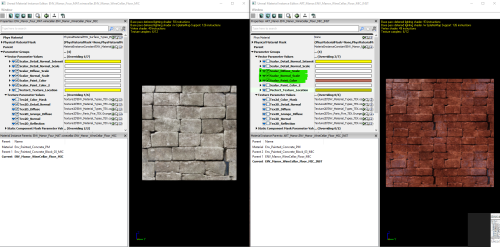
| To alter the await of the modular mesh pieces (or any mesh in the SDK), you employ a Material Instances onto them. A Material is a shader that combines the textures (diffuse, normal, specular, etc) so it can be applied onto a mesh within the editor. The SDK already has a large library of materials that yous have access to:
You tin can also create custom variations of the MICs specifically for your map!
You may notice that some props take more than ane slot for a material, but experiment to see which areas the materials impact.
| Figure 5.2: Left: Original MIC from Volter Estate. Right: New Custom MIC, note the highlighted ticked sections that alter the MIC scale and colour |
Creating Interesting Levels with Props
If y'all are just starting out, it is highly recommended that yous go and spend some fourth dimension looking at the official maps to see how they identify props, materials and lighting effectually the level. You can mix and lucifer and even copy+paste avails directly from those maps into yours. If you want a comprehensive guide on how to place props and change materials the video below does an astonishing task:
Community Tutorial (past Seanchaoz): KF2 SDK - Guide to making interesting room geometry
| | When you re-create objects in the Editor, it copies it as plaintext. Yous can paste this into notepad merely in instance the editor crashes when you load another level. |
| | Some maps have locked the assets from being moved. Yous can disable locking by right clicking the assets and disabling "Transform > Lock Actor Motion" |
Creating Landscapes
| | Currently Landscapes are bugged and official Materials and MIC are not working for custom maps and a workaround is required. This is a intermediate/advanced workaround and knowledge of a 3D Modelling program is required. More than details are available in the link below. |
If you are only starting out, I recommend making a map out of the modular kit offset. The beneath guide will tell you lot everything about how to add one to your map if you wish to procede:
Comprehensive Wiki Guide: Setting Up Landscapes (Killing Flooring 2)
World Lighting
If you have simply been working with the Modular Kit y'all accept most likely been in Unlit fashion (Alt+three) which is unaffected by lighting. If you lot get to Lit style (Alt+4), yous will notice the scene is completely blackness. This is because in that location is no lighting prepare up in the map yet.
Adding Ambient Calorie-free - Skylights
To get basic ecology/ambient light we need to add SkyLights.
- Become to the "Actor Classes" Tab from the Content Browser
- Navigate to "Actor > Low-cal > SkyLight"
- Drag and drop a Skylight into the scene (Do not use the SkyLightToggleable)
If yous are in Lit Mode then you volition see your scene light upward. As a general rule, ambient lights should be rather subtle and not as powerful as the default value of '1'. Official Maps have values that range from 0.05 (Volter Estate) to 0.xv (Outpost) for their skylights. So values between 0.01 and 0.two are good ranges.
So lets change the value to be what is normally more acceptable for KF2 maps:
- Select the SkyLight and Press F4 to open the Properties
- Nether "Light > Low-cal Component > Low-cal Component > Brightness" (should be open up by default), modify the value to something like '0.1'
- You can also alter the tint of the lighting to align with your map'southward mood by changing the "Calorie-free Color" under the Brightness setting
- If your ceilings are too night you can change the "Light > Lite Component > Sky Light Component > Lower Effulgence" to something effectually '0.01'
- Again you want to apply very low numbers hither
KF2 Maps can accept a total of two SkyLights; 1 for Outdoors and 1 for Indoors. You tin select which SkyLight affects each area in the properties:
- Set "Light > Light Component > Calorie-free Component > Override Auto Lighting Channels" to True/Enabled
- Selecting which Channel to affect under "Low-cal > Light Component > Light Component > Lighting Channels"
- Without the 'Override Machine Lighting Channels' property enabled, the SkyLight volition default to whatever book it is in. We just enable it to take greater control.
A secondary requirement for multiple Skylights is that you demand a TWIndoorLightingVolume or TWOutdoorLightingVolume. The LightingVolumes tell the editor that the avails (Props and Lights) within this volume are either Indoor or Outdoors, and will build the lighting accordingly. Since Indoors are usually contained within Outdoor environments, in near cases we just need to specify an Indoor Volume to save time.
To create lighting volumes:
- Select the Architect Castor (The Red Wireframe Cube in the scene)
- Press 'B' if you cannot see it (it may exist hidden)
- Motion the Builder Brush somewhere indoors to test
- On the right toolbar select "Volumes > Add together Volumes" and click a TWIndoorLightingVolume (Come across Figure 6.1)
- Motion the Architect Castor somewhere and you volition see a pink cube left backside - this is your Book
- You can change the general size of the volume by clicking Geometry Manner (Shift+2) and selecting the Volume faces and moving them where y'all want them
- You can shift back into Camera Manner with Shift+1
- Press the Build Geometry button to recalculate the Volume (See Figure 6.one)
- Press the Build Lighting button, a prompt will appear only but click OK
- Yous should notice after the game has finished building that all the meshes that intersect the Indoor Volume should be lit by the Indoor SkyLight (if you had ready them up already)
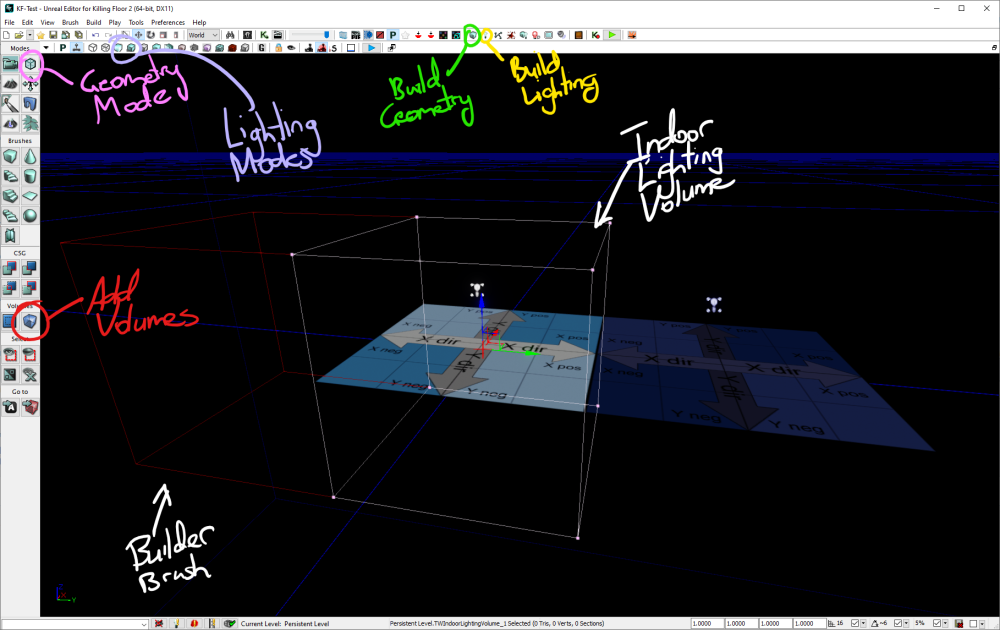
Effigy 6.1: Building lighting volumes action locations
General Lighting
Lighting from this point onwards is pretty piece of cake. There are ii main types of light you can place into a scene. Both these lights take properties such as Brightness, Radius, Calorie-free Color which you can be creative with, you lot can even add flickering behaviors to them.
- PointLights - Which provide light in a sphere like radius
- Yous can place a low-cal in the scene by belongings 'Fifty' and left clicking.
- SpotLights - Which provide a cone of light in the direction it is facing
- You can convert a PointLight to a SpotLight by right clicking the PointLight and selecting "Convert Light > SpotLights > SpotLight"
| | LIGHTING HAS THE LARGEST Touch ON PERFORMANCE |
| | Tips for working with Lighting Performance:
|
Lighting Documentation
First-class Community Tutorial (past Seanchaoz): KF2 SDK Guide - Bones Lighting Tutorial
Shadow System Technical Documentation: Shadow System Technical Documentation (Killing Floor 2)
Building (Baking)
At this bespeak you are probably putting down lots of props and lighting, simply you may notice that objects are not looking correct within the editor. When we want to update the map afterwards lots of edit, we have to 'Bake' or 'Build' our map. Building takes time and scales with size and complexity of your map. It is not required to do all the fourth dimension, merely when y'all need to update certain aspects of your map to verify and examination. Effigy 7.1 shows their location.

Figure 7.1: Yellow Highlight: Build Options from left to right: Build Geometry, Lighting, Paths, Splatter Maps and Build All. Orange Highlight: Publish/Cook Map - Encounter Note below.
There are 5 sorts of Builds we are often concerned with:
- Build Geometry - When we make any changes to Volumes or Brushes created with BSP Brushes/Geometry mode, the changes volition not exist updated until we actually rebuild the geometry
- This is particularly important to remember when we are making/editing Blocking Volumes for Players and Zeds
- Build Lighting - Equally we change Skylights, Pointlights and SpotLights in our scene, we want to cheque how they expect, whether they accept the right lighting and specifically with this build, shadow map creation.
- This will exist the main build that nosotros do to check for visual quality as nosotros build our map
- This build process takes the longest based on the map size
- Build Paths - Used to build pathing that Zeds/AI/Trader Paths employ
- Build Splatter Maps - A KF2 specific build that generates unique maps for persistent blood on meshes as you play the game
- Build All - Builds all of the above in one Bake
| | "Cooking" is another term you may hear. It is the aforementioned as Baking except it volition package the map and some boosted shader files in a not-editable Map file in C:\Users\username\Documents\My Games\KillingFloor2\KFGame\Published. It is done automatically by the SDK Upload Tool when yous upload to the Workshop. It too has more advanced utilise when testing custom materials which required a packaged map. It is not recommended that you cook your map within the Editor. Stick with standard baking. |
Common Errors and Issues from Edifice
| Error | Set |
|---|---|
| Alert: Maps not congenital with production lighting | This warning will always occur and you can safely ignore it. You lot cannot get rid or fix information technology. |
| Alarm: Map should have KillZ set - fix this to something sensible so that the actor doesn't fall forever | Set a value in "View > Globe Properties > Zone Info > Kill Z" to something like -10000 |
| Warning: 'Role player' - CanBecomeDynamic Actor has BlockActors Enabled <PostLoad> | Can safely ignore this warning. Pops up on Actors that usually become knocked around past Physics and Players. Does non affect gameplay. If you really want to get rid of it, get to the actor'due south properties and disable the pick at "Actor > Actor Component > Standoff > Block Actors" |
| Error: No shadowmap generated for 'ActorName' of possessor 'ActorName'. Check if mesh has lightmap UVs | This occurs when actors that don't accept Lightmap UVs (UV1) endeavor and build Shadow maps. May not have a visual impact. Yous can set this past either creating new Lightmaps for the mesh in an external 3D Plan or by Disabling "Role player > Player Component > Lighting > Precomputed Shadows" or Disabling Shadow Casting entirely for it. |
| Warning: DecalActor : Decal player does not have any overlapping actors | Tin safely ignore this warning, has no impact on functioning or gameplay. Occurs when y'all have two or more Decals projecting ontop of each other. You can endeavor and fix it past adjusting Decals then they practise not overlap. |
| Alarm: Volume/Brush : Brush has non-coplanar polygons | May cause gameplay issue and fifty-fifty SDK crashes. Occurs when a face of a Brush is not flat/planar from editing it at some point Easiest gear up is to delete it and rebuild the Brush |
| Performance: SkeletalMeshActor Skeletal Mesh component 'SkeletalMeshActor' non using a light environment or custom lighting channels - this volition be inefficient and have incorrect lighting | Can safely ignore, volition unlikely to have an noticeable affect on performance Can fix it by Enabling "Skeletal Mesh Thespian > Light Environment Component > Enabled" |
| Mistake: PathNode : Navigation point non on valid base or too close to steep slope Alert: PathNode : has no paths, and is non within the navmesh! (If this is a destination or something for players just set bDestinationonly=True) | Pathnode may be floating in air, too far from footing or cannot find adequate place to snap to, inside a mesh or blocked from other pathnodes. Just move it around until information technology is fixed |
| Warning: KFSpawnVolume ValidatePathingFromMarkers finished just at that place are no spawn positions! for KFSpawnVolume Warning: KFSpawnVolume ValidatePathingFromMarkers: KFSpawnVolume can't find an anchor from marker one | Spawn Volume cannot place spawn positions due to no ground being present or a prop blocking it from having enough space, only shift the volume or props effectually. |
| SDK Bugsplat when Building Lighting | Could be a large number of things, merely the well-nigh common result is building lighting on BSP Brushes To fix, select all Brushes in the Scene Window, delete them and rebuild Geometry. Save and try over again. If error continues, it could be something else. You lot tin check the Crash Logs located at |
Using the BSP Castor and Creating Volumes
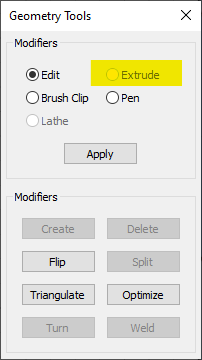
| We used the Architect Brush when we created the Lighting Volumes earlier, but it is used for a lot more than. Formally it is known as a BSP (Binary Infinite Partition) Castor and uses the CSG (Constructive Solid Geometry) modifiers located on the correct tool bar. We can create a lot more than than merely cubes and rectangles as well. When nosotros are Geometry mode we get a dialog window that allows u.s.a. to use the Edit or Extrude Modifier (See Figure 8.1). In extrude mode, if you select a confront and drag it out with the transform gizmo, you lot tin create additional space to the Brush. You can also grab the Edges of the Castor and motion them. These actions will be plenty to get you 95% of the way with using the BSP Brushes.
There are certain circumstances where yous will demand more unique shapes, such as shapes with a pigsty. To achieve such shapes nosotros can utilize the CSG Add and Subtract Modifiers. These will create physical meshes within the Editor that you can interact with. We should not use these to make out maps and instead use them to create unique shapes for our Brush. When y'all have your unique Castor, you can use the Intersect Modifier to make a 'cage' of the Brush with the Builder Castor that you lot tin apply to add your volume. Using this method tin leave behind hidden "Castor" actors which tin can only be removed through the Scene Tab, once removed make sure to rebuild the Geometry of the map.
The video below shows how to utilise brushes in 2 ways:
Technique 2 is typically ameliorate in the long run every bit it is less buggy and requires less clean up. Still if yous make a error and with Ctrl+Z/Undo beingness prone to crashing the editor, yous will need to remake the brush. Customs Tutorial (past Delta): KF2 SDK - Making Volumes 2 Ways | Figure 8.i: Window that pops upward when Geometry Way is agile. Note: The Extrude role is greyed-out, y'all need to select the Brush/Book face to be able to select information technology. |
Important Volumes
| Book Proper noun | Description |
|---|---|
| PawnBlockingVolume KFPawnBlockingVolume | Does exactly equally the name suggests, blocks Players, Zeds/AI and PlayerZeds from passing through them. KFPawnBlockingVolume is different as it has options for Versus way. You can utilise either for creating blocking volumes for your map. |
| KFSpawnVolume | This is where Zeds will spawn, allows you to specify corporeality of spawn points, spawn delays and active areas. Further Documentation: Setting Up Navigation (Killing Floor ii) |
| TriggerVolume | These are used to activate Portal Spawns (Zeds popping out of vents and sewers). It is also used for scripted Kismet and Level events if Players or Zeds are in the Volume. |
| KFReverbVolume | Affects how the sound will reverberate when the player is in that book. Eg: In a open up outside area or in an indoor small room. Further Documentation: Setting Up Map Audio (Killing Floor 2) |
| KFDialogEnvironmentVolume | When a player enters these volumes information technology will play a piece of dialog based on the character and sort of environs state yous set in the book. |
Setting Up Gameplay
Role player Spawns (KFPlayerStart)
When players start a game or respawn at the end of the circular they spawn on these nodes. They also human activity similar regular path nodes for Zeds and Trader arrows.
There is Kismet in Official Maps to choose which prepare of KFPlayerStarts they spawn on at the start of the game, simply this will not exist used once again on respawning at the end of a round. The game will select the beginning ready of PlayerStarts it has in memory.
You lot will desire at to the lowest degree half dozen for standard maps. If you are making a Holdout/Objective Map, probably include more in each arena for servers that run more the 6p.
Customization Points (KFCustomizationPoint)
Customization Points are used at the start of the game where player need to prepare upwardly. They are ordinarily hidden far away from the chief playable infinite of the map (either really high up or below the map). The easiest way to find them on official maps is to search for the histrion in the Scene Tab.
Wiki Documentation: Setting Up Navigation (Killing Floor 2)
Tips:
- N will toggle node visibility.
- P will toggle path line visibility.
- Use "KFPathNodes" rather than "PathNodes". But regular PathNodes will still work.
- Generally we want a nice grid of pinkish navigation lines between the nodes. Whites paths are fine. If you are getting a lot of green and blue lines you may want to look at irresolute the location of props and nodes.
- For very tight areas in maps, such as narrow doors, or tight sections effectually props, you volition want to add "KFTrigger_ChokePoint"
- These will compress the collision of Zeds so they do non get stuck on props or each other.
- It's advisable to try and orient path nodes in directly lines, as zig-zagging zed pathing is fun for no one.
- Spacing between nodes is subjective but any distance between 320-640 is good.
- Closer than 320 is considered overkill; but it is fine to increment density around props that Zeds demand to path around.
- Further apart will not really be dense enough for smooth navigation for the Gameplay
- Just checkout how official maps orient their nodes.
- There is 1024 a limit for PathNodes that y'all can have on a map; having more than volition significantly increase build time and pathing/trader trails will not work properly.
Zed Spawning (KFSpawnVolume)
Wiki Documentation: Setting_Up_Spawns_(Killing_Floor_2)
Spawning Zeds is rather directly forrad. Create a KFSpawnVolume, suit its size and put a path node in the volume.
Portal Spawns (KFSpawners)
Wiki Documentation: Setting_Up_Spawns_(Killing_Floor_2)#KFSpawner
The easiest way to get these into your map is to but copy and paste them from an existing map. Requirements for them are linked below.
Brand sure you read and add the Kismet Requirements documented beneath. If yous do not, Zeds will not spawn.
Traders
The easiest way to get a trader into your map is to re-create and paste a trader from an existing map. Traders are made upwards of 2 actors and then make sure yous re-create both:
- A KFTraderTrigger
- A Trader SkeletalMesh
The KFTraderTrigger is what the players actually interact with, when they are inside information technology's collision radius they can use it. The SkeletalMesh is only the Prop representation of the Trader and can exist basically anything (eg: Infernal Realms).
| | The KFTraderTrigger also acts every bit a path node and then the Trigger itself and cannot be blocked by the actual Trader Mesh. For trader arrows to path to the correct trader make sure the following is correct:
|
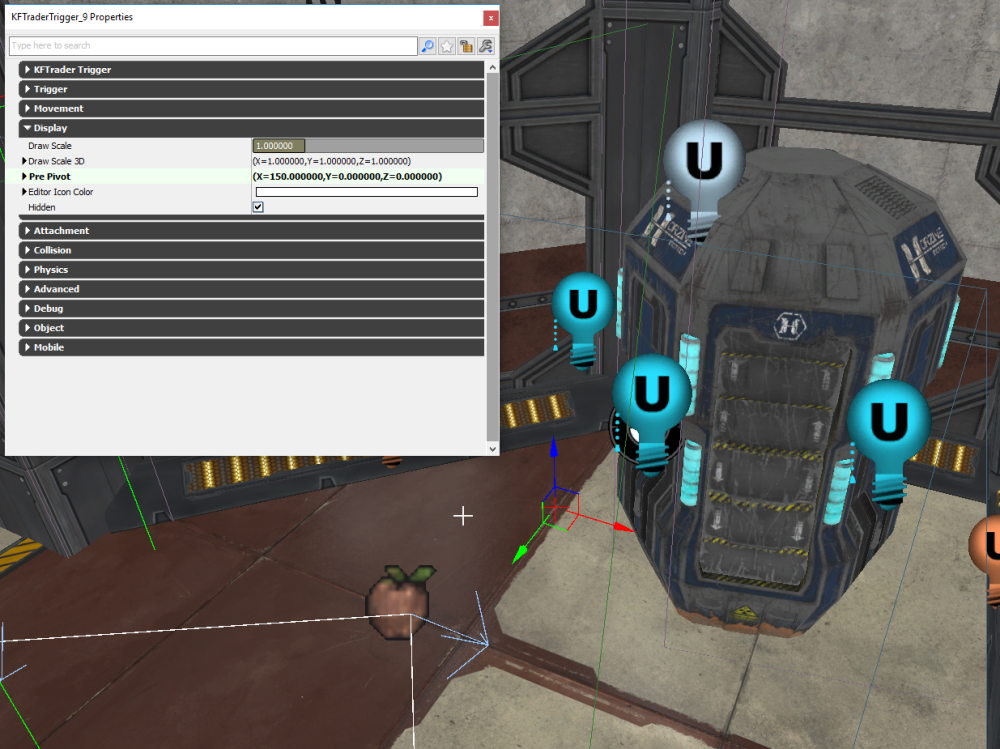
Figure 9.1: Adjusting the Trader Trigger Pre-Pivot to be simply outside the Mesh and then the trader arrows path correctly.
Ammo and Weapon/Armor Spawns
Wiki Documentation: Setting Up Pickups (Killing Floor 2)
| | Standard sized maps utilized between 14-20 Ammo and xiv-20 Weapon Pickups effectually the map |
Doors
Wiki Documentation: Setting Up Doors (Killing Floor two)
| | Doors have a VERY specific set of requirements for them to work correctly, make sure yous carefully read the documentation above. |
Testing Your Map
Yous can play your map directly in the editor by pressing the "Play level in editor button"/Play in Editor (PiE), F8, or you can right click anywhere on the map and select "Play from Here".
By default no game fashion volition be active simply you can test things like general feel of the map, lighting, collisions and then forth.
To test gameplay, open the console (~) in game and use these commands:
| Command | Function |
|---|---|
| ToggleSpawning | Will allow you play the default game listed in your WorldInfo in the Editor |
| EnableCheats | Will open up upwards well-nigh commands |
| God | Toggles God Mode |
| DemiGod | Will accept damage but will never die |
| Ghost | No prune way |
| Wing | Can fly around the map with collision enabled |
| Walk | Disables Ghost/Wing mode |
| Loaded | Will give you nearly all the weapons in the game |
| UberAmmo | Volition give you nearly unlimited ammo |
| Chris | Will give you God, Loaded, UberAmmo and enable ToggleSpawning |
| Stat FPS | Will show you your fps while in game. Our become to for performance checking. |
Full List of Console Commands: Useful Console Commands (Killing Floor 2)
What should I be testing for?
TL;DR - TEST EVERYTHING
- Operation - Practise we accept stable frames on every part of the map?
- Walk around the map and take note of where FPS drops as y'all look at it at different angle - Is the FPS changing drastically?
- FPS is very dependent on your ain PC. To go a baseline of what you should be aiming for, open upward Official Maps that are similar to yours and enable stat fps:
- If you have an open outside map, check performance against Black Forest
- If you have an indoor map check performance against Biotics Lab
- If y'all have a combination of both, check performance against Burning Paris or Outpost
- Remember that lighting plays a very large role in performance!
- Collisions - Do players or Zeds get stuck?
- Run around your map and hug corners, make sure y'all do non get caught on anything.
- Play the game as you would unremarkably and lookout how you and the Zeds walk around objects and props
- Are y'all or Zeds getting caught on annihilation?
- Are Blocking Volumes working equally intended?
- Zed Spawning and Pathing
- Play the game in exclusively in specific areas to test Spawning, Pathing and Performance
- Are spawns also slow or besides fast?
- Are the portal spawns working?
- Are trader arrows navigating to the right traders?
- Are Zeds attacking welded doors or standing still?
- Exploits and Bugs
- Tin the players leap on top of annihilation they shouldn't be able to?
- Can Zeds get to the players wherever they go?
- Can the player leave the map?
- Is the Gameplay Fun?
| | Testing in Editor VS Base Game VS On a Server
|
Map Optimization
Map Optimization is the arguably one of the about important steps when completing a map. Aside from having practiced playable spaces, the map needs to perform well on all machines; maintaining stable Frames per Second (FPS). The following guide is a comprehensive list of areas that should be addressed before publishing a map. EVERY step should be evaluated and addressed every bit they volition all add together to operation.
Comprehensive Wiki Guide: Map Optimization Guide (Killing Floor two)
Publishing to the Workshop
KFWorkshopMapSummary.iniBy default, maps natively back up Survival, Weekly, and Endless game modes; If yous were to upload the map direct with the Workshop Upload Tool, your map would be playable in these game modes. Objective mode is set up to imitation so the map will non show upward in pick in Objective Gamemode. To enable this you take to create and bake an additional .ini file into the map during upload. Additionally if y'all had a map which didn't support a game mode (eg: Progression or Holdout not being supported in Endless) this .ini will allow you lot to remove map selection when that game mode is active. Create a KFWorkshopMapSummary.ini inside the following location: C:\Users\UserName\Documents\My Games\KillingFloor2\KFGame\Config\Config
Re-create and paste the following into the KFWorkshopMapSummary.ini [KF-MAPNAME KFMapSummary] MapName=KF-MAPNAME MapAssociation=0 ScreenshotPathName=UI_MapPreview_TEX.UI_MapPreview_Placeholder bPlayableInSurvival=Truthful bPlayableInWeekly=Truthful bPlayableInVsSurvival=True bPlayableInEndless=True bPlayableInObjective=False
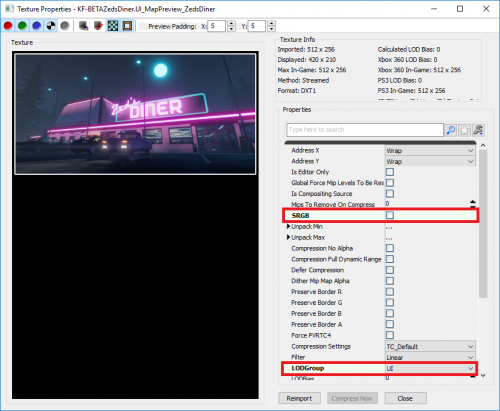
Custom Map PreviewIf you want a custom map preview you will need to include a map preview image in the map:
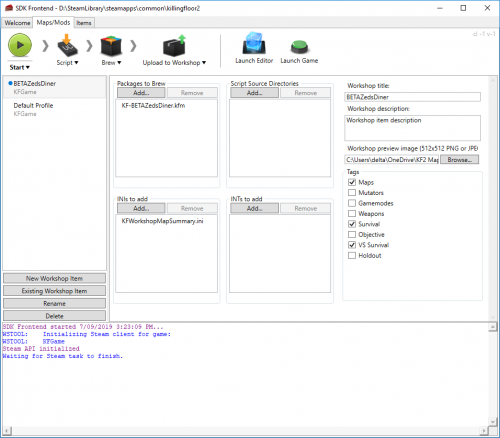
Uploading using the Workshop Upload ToolTo admission the Upload Tool, open up upwards your Steam Library Tools and right click on the Killing Floor SDK and select 'Workshop Upload Tool'. The upload steps are pretty straight forward:
Figure 12.2 shows what the Upload tool looks like with the provided .INI and MapPreview package. | Figure 12.1: Untick SRGB and change the LODGroup to UI Figure 12.2: What the Workshop Upload Tool should look like just earlier you lot upload |
Final Words
The guide above covers all the core concepts for creating maps for KF2 and it is actually up to you on how y'all make your map. At that place is surprisingly quite a lot of freedom provided by SDK and so let your craziest dreams go wild!
If you have whatsoever problems, need some assistance or advice/feedback experience complimentary to ask the Community, we are pretty willing to help and we don't seize with teeth. Nosotros were all but starting out at one point or some other and were in the aforementioned position as you.
Official KF2 Discord: https://discord.com/invite/killingfloor
All-time of luck to all new mappers!
-Delta
| Killing Floor 2 SDK Navigation | |||||||||
|---|---|---|---|---|---|---|---|---|---|
| Mapping |
| ||||||||
| Modding |
| ||||||||
| Resources |
| ||||||||
Source: https://wiki.killingfloor2.com/index.php?title=Getting_Started_with_Mapping_%28Killing_Floor_2%29
0 Response to "Killing Floor 2 Wmap Orkshop Tutorial Upload"
Post a Comment